Be.Baking has moved!

You should be automatically redirected in a few seconds. If not, visit
http://bebaking.com and update your bookmarks.

Sunday, February 21, 2010

Homemade Granola Recipe


People are funny about granola. Everyone seems to have their own verrrry specific taste preferences when it comes to this glorious oat concoction. Some people like it to be very crunchy without many chunks, others like it a bit chewier with lots of clusters. Some like nuts, others don’t, some like it to taste “healthy” while others prefer it to be a bit more dessert-like.

And really, there is a humongous difference between good and bad granola. The bad stuff is enough to convince people they hate granola…and sadly, that’s the stuff on most grocery store shelves.

But, if you take the leap and make granola at home (and it’s surprisingly easy to make), well then you never have to suffer the sad saga of crappy granola ever again.

When it comes to granola, crunchy and crispy is the way I roll. I like lots of big chunks and clusters (easier for snacking). I prefer granola just lightly sweetened, which means I can still feel virtuous eating it for breakfast, but I do like subtle hints of vanilla and some caramel/nutty flavors.

After lots of recipe testing, I found that using a combination of agave nectar and dark brown sugar for sweetness and a bit of grapeseed oil (instead of butter or another oil) provides the most mouth-watering flavor. Oh, and don’t forget the salt!


I use slivered almonds for their taste and texture, and I swear that adding some shredded coconut seals the deal. I like dried cranberries for their tang. Oh, and for some reason, a proper granola just HAS to be full of sesame seeds. This is probably my Mom’s doing….my recipe is based loosely on hers.

Crispy Crunchy Cranberry Almond Granola

3 cups rolled oats
¼ cup sesame seeds
¾ cup slivered almonds
¾ cup shredded coconut

¼ cup dark brown sugar
¼ cup agave nectar
¼ cup grapeseed oil
¾ tsp salt
1 ½ tsp vanilla

½ cup cranberries
½ cup raisins

Turn oven to 350 degrees. Toast the oats, sesame seeds, almonds and coconut on a rimmed sheet pan for 7 minutes stirring once (watch the coconut because it browns quite quickly).

Meanwhile, in a saucepan over medium heat, combine dark brown sugar, agave nectar, grapeseed oil and salt. Stir occasionally until brown sugar dissolves. Take off heat and stir in vanilla.

Reduce oven temp to 300 degrees

In large bowl, mix the warm oat mixture with the brown sugar mixture and toss to coat. Add the cranberries and raisins and mix well.

Pour mixture into a greased “brownie/lasagna pan” and bake for 20-15 minutes. Let cool slightly before breaking into chunks. Keep in a sealed plastic bag or container.

Sunday, February 7, 2010

Cranachan with Oat and Almond Streusel


Please let me introduce you to one of my newest dessert obsessions...the Cranachan. This Scottish dessert is delectably creamy yet light and luscious.

Cranachans are made with yogurt, whipped cream, honey and whiskey and traditionally host loads of fresh raspberries folded into their creamy middles. However, berries aren’t in season but citrus is at its peak, so my version of the Cranachan includes blood orange and navel orange segments. Thinking back to childhood memories of orange creamsicles, I added a vanilla bean to the mix and the whole thing just sung.


A homemade Oat and Almond Streusel is crumbled on top, giving nice crunch and texture. This dessert is easier than pie to put together and the reward is just delicious.

Citrus Cranachan
2 cups whole milk yogurt (or greek yogurt)
2 cups heavy cream
1 vanilla bean, seeds only (or you can use 2 teaspoons extract)
½ teaspoon lemon zest (optional)
½ cup scotch
2/3 cup honey
pinch of salt
Orange segments, skin and pith removed

Whip the cream with the vanilla, lemon zest and salt until stiff peaks form. Set aside.

In another bowl, whisk together the honey and whisky. Whisk in yogurt until completely smooth.

Fold the whipped cream mixture into the yogurt mixture in three additions. Put into serving dishes and top with orange slices and Oat and Almond Streusel (recipe below).

Oat and Almond Streusel
2 cups rolled oats
1 ½ cups sliced almonds
¼ teaspoon cinnamon
½ teaspoon salt
½ cup honey
½ cup grapeseed oil
1 ½ teaspoons vanilla

Preheat oven to 300 degrees.

Combine the oats, almonds, cinnamon and salt in a medium sized bowl. Set aside.
Combine the honey, grapeseed oil, and vanilla in a bowl. Whisk to combine. Pour the honey mixture over the oat mixture and stir with a silicone spatula to coat. Spread mixture on a sheet tray lined with parchment paper (or sprayed with pan spray) and bake for about 25-30 minutes until golden (stirring mixture after 12 minutes).

Monday, January 18, 2010

Sour Cherry and Raspberry Crumble Bars

Here we are in the middle of January and I am inconveniently craving berries. I need a berry fix...and nothing else will do.


Because we are months away from berry season, baking with frozen berries or a high quality jam is a good compromise. I particularly like making Sour Cherry and Raspberry Crumble Bars. It is an incredibly simple recipe that includes a buttery and tender shortbread crust that is spread with sour cherry jam and dotted with frozen raspberries. Then, more of the dough is crumbled on top so that the beautiful jammy filling is peeking through the golden crumble.


When these bars are baking, the delicious smells that come out of the oven will make you wish air was edible.

Sour Cherry and Raspberry Crumble Bars
1 (10 ounce) jar sour cherry preserves
3/4 cup raspberries (thawed, if frozen)
1 teaspoon lemon juice

1 1/2 cups butter, softened
3/4 cups sugar
2 large egg yolks
1/2 teaspoon vanilla extract
1 teaspoon lemon zest
Pinch of salt
2 1/2 cups all-purpose flour
3/4 cup rolled oats

Directions
Preheat oven to 350°

Combine preserves, raspberries, and lemon juice in small bowl; mash with fork until combined but some berry pieces remain. Set aside.

Beat butter, sugar, salt and lemon zest in mixer bowl until light in color and fluffy.

Beat in egg yolks (one at a time).

Beat in Vanilla.

Mix in flour, salt and oats until a soft dough forms.

Divide dough in half.

Press one half into 15x10-inch jellyroll pan.

Spread the dough evenly with the fruit mixture.

Scatter the remaining dough on top of the preserve layer (clump dough with hands)

Bake 45 minutes, or until golden brown.

Cut into bars.

Tuesday, January 5, 2010

Farmer's Market Therapy

Whew! We have survived yet another hustley bustley holiday season. Oh the family, oh the friends, oh the food. And then after all the commotion, suddenly it’s a new year and it’s back to reality. As I jump into 2010 I’m excited about a couple of pastry opportunities that have come my way, but along with these good things comes stress.


I was in particular need of some perspective this morning, so I put on my Nikes and jogged to San Francisco’s Ferry Plaza building where a Farmer’s Market was taking place. Just being around such beautiful produce and fabulous foods helps me feel more grounded and inspired.


The lovely citrus fruits are starting to take over…I envision some tartly sweet Meyer Lemon Curd and Blood Orange Ganache in my future.

Oh and the beautiful sweet potatoes (for those of you who watched the most recent White House episode of “Iron Chef”, I apologize for yet another sweet potato reference). But really, they are delicious.


My favorite way to cook sweet potatoes is to cut them into slices, toss them with some grape seed oil (an oil with a high smoke point and neutral flavor), salt and pepper and stick them in the oven (covered with aluminum foil)…then I turn up the heat to around 400 degrees. About 30 to 40 minutes later (take off the foil about half-way through cooking), you will have the sweetest and most delectable sweet potatoes….ever.


The real trick here is to NOT preheat your oven…stick the sweet potato slices in a cold oven and only then should you turn it on. That is THE secret to getting the best and sweetest flavor from these orange beauties.

Now that I've had my Farmer's Market fix, at least until next week, I feel ready to take on 2010 with gusto!

Share

Monday, December 28, 2009

Poppy Seed Roll

Poppy Seed Rolls remind me of my Mom, who I'm missing a lot after a nice holiday visit. Since she's on my mind, I decided to bring the glory of the Poppy Seed Roll to this sweet little blog space.


My Mom’s stories of the delicious Poppy Seed Rolls she ate as a child are missing just one thing: my Grandmother’s recipe. This is obviously a situation that needs to be rectified…

And so, I took it upon myself to create the Poppy Seed Roll of my Mom’s childhood; a softly sweet, bready roll spiraled with lots of poppy seed filling.

You can opt to make or buy poppy seed filling (I’ve had luck with the poppy seed filling made by a company called Solo). However, your most delicious bet is to make the filling yourself, and its actually quite easy. Simply simmer poppy seeds down with some milk, sugar, honey, orange zest, a pinch of salt and a hint of vanilla (raisins are NOT permitted…Mother’s rules). When it tastes delicious, your filling is done.


I recommend wrapping the poppy seed filling up in a light and buttery dough. I like using the same dough I use for Cinnamon Buns, you can find the recipe here: http://bit.ly/7Pd7sj . Next, I roll out the dough, load it up with poppy seed filling, roll it up and then bake it until golden. I like to then paint it with a bit of warmed apricot jam and drizzle on some simple vanilla glaze made of confectioner’s sugar and vanilla extract.


Yum…a soft and light bread full of deliciously sticky poppy seed filling…which is slighty nutty and has a teeny little crunch. The gentle tang from the apricot jam is perfect. If you’ve never tasted a Poppy Seed Roll before, I urge you to try this out...and don’t forget to share the recipe!

Share

Friday, December 18, 2009

A Holiday Cookie Recipe and How to Ship Baked Goods

Egads! The dilemma of the holiday season is upon us: what the heck to get everyone on your list. Well I have an answer for you…and it’s sweet and lovely and involves butter. Simply bake up some delicious goodies, package them ever so cutely, and…presto gifto!


To start you off right in your holiday bake-a-thon, I have a perfect holiday butter cookie recipe to share. This butter cookie is sturdy enough to hold up to extensive decorating and won’t turn to dust if jostled around a bit. It’s also so delicious that you’ll have a hard time giving these cookies away. Of course, if you “accidentally” break a few cookies…well then you’ll just HAVE to eat them yourself.

These cookies are also incredibly versatile. You can cut them out and decorate them with colored sugars, sprinkles and frostings. Or, you can turn them into thumbprint cookies with jam in the middle. Or perhaps you’d like to make them into sandwich cookies? Oh yes, you get to unleash your creative side with these babies.


After you’ve baked your storm of cookies, you can package them in a nice tin and hand them off to a friend that lives nearby. Or, for those people that don’t live so nearby, you can ship these cookies (another reason I love this recipe).

When shipping cookies, you should either wrap each individual cookie in plastic wrap or stack a few together before wrapping (sometimes I like putting the cookies into clear plastic bags instead and tying it with ribbon for a nice presentation). The cookies will need to be packaged together tightly. I like using tissue paper between each cookie/stack of cookies to insulate them.

It’s quite important to include two lines of defense when mailing cookies. You should not only have the box with the cookies inside of it, but also another shipping box. You will also need to pad the internal cookie box from the external one. I like using wadded up paper bags, but I’ve heard of people successfully using air-popped popcorn, bubble wrap or paper shreds as well.

Here’s to holiday gifts full of deliciousness!


Butter Cookies
Adapted from Cook’s Illustrated

2 ½ cups unbleached all-purpose flour
¾ cup sugar
¼ teaspoon salt
2 sticks unsalted butter, cut into 16 pieces and at cool room temperature
2 teaspoons vanilla extract
2 tablespoons cream cheese, cool room temperature

In a stand mixer fitted with the paddle attachment, mix the flour, sugar and salt on low speed until combined. With the mixer running, add the butter one piece at a time; continuing to mix until mixture looks crumbly and slightly wet, about 1 minute longer. Add vanilla and cream cheese and mix on low until dough just begins to form large clumps, about 30 seconds.

Remove dough from mixer and knead by hand in the bowl for 2 or 3 turns to form a cohesive mass. Turn out dough onto counter and divide in half, pat into two 4-inch disks and refrigerate for 20 -30 minutes.

Heat oven to 375 degrees. Roll out dough between parchment paper to 1/8 inch thick, chill for 10 minutes. Cut into desired shapes and place the cookies 1 ½ inches apart on parchment lined cookie sheets. Chill again for about 10 minutes. Bake until light brown, about 10 minutes. Decorate as desired.

Share

Wednesday, December 9, 2009

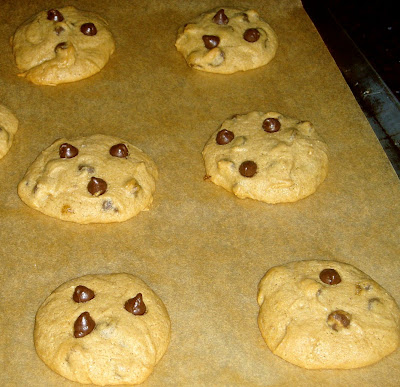
Low Fat Chocolate Chip Cookies


‘Tis the season for holiday cookies! Sugar cookies, molasses cookies, spice cookies, nut cookies, big cookies, small cookies, rolled cookies drop cookies, cookie bars…sheesh…I’ve got a lot of baking to do! Speaking of which, I want to share one of my favorite cookie recipes with you…something to keep in your cookie arsenal for years to come: Chewy Gooey Low Fat Chocolate Chip Cookies.

Yes, you read correctly LOW FAT cookies. Now, before you run for the hills and start cursing my name, please give this recipe a chance. I promise you that it’s not just some cardboardy cookie with the single virtue of being better for you. The number one reason you will love these cookies is because they are fantastically delicious. The low fat bit just makes the package that much sweeter.


This ooh so gooey and chewy chocolate chip cookie recipe is a bit different than a traditional chocolate chip cookie recipe. First, it relies on browned butter (a technique where butter is melted on the stove until it turns light brown and starts smelling nutty). Browning the butter bumps up the buttery flavor meaning you can use less of it while maintaining the same intensity. Also, in order to keep these cookies moist and chewy, dates are used. The dates are chopped up, cooked down and strained so they become a puree (and are undetectable in the final cookie). The dates do not impart any fruit flavor in this cookie, thanks largely to the browned butter.


The rest of the ingredients are more standard…I like to use all dark brown sugar because I like it’s deep intensity. A good amount of vanilla and some salt round out the rest of the flavors and make these cookies out of this world. This is a chocolate chip cookie recipe to replace all others.

Chewy Gooey Low Fat Chocolate Chip Cookies
(adapted from Cook’s County)

1 cup water
4 tablespoons finely chopped dates (I like using Medjool dates)
3 tablespoons butter
2 cups all-purpose, unbleached flour
½ teaspoon baking soda
½ teaspoon salt
1 ¼ cups packed brown sugar (dark or light)
1 large egg
2 teaspoons vanilla extract
½ cup semisweet chocolate chips

Preheat oven to 325 degrees. Line 2 baking sheets with parchment paper.

Bring water to boil in small saucepan and add dates. Simmer until tender and most of the water has evaporated (~20 minutes). Using a rubber spatula, press dates through a fine-mesh strainer into a medium bowl (discard the bits that you can’t get through the strainer). You should have about ¼ cup of the date puree.

Cook butter in a saucepan over medium heat until nutty brown (~4 minutes). Let cool.

Whisk the flour, baking soda and salt in a medium bowl. Set aside.

Beat (with a stand mixer or by hand) the browned butter, brown sugar and date puree in a medium bowl until blended. Beat in the egg and vanilla until combined. Add flour mixture and mix until combined. Reserve 2 tablespoons chips and stir remaining chips into the batter by hand.

Roll 2 tablespoons of dough at a time into balls to get 18 cookies. Space the cookies about 2 inches apart on the cookie sheets. Press the remaining chocolate chips evenly over the cookies.

Bake until the edges are golden brown and center are soft and puffy, 15-18 minutes. Rotate the cookie sheets halfway through baking. Cool cookies completely on baking sheets.

Share